


Blog
Masturbation Cup Troubleshooting: How Do You Diagnose Suction Loss, Motor Stalls, Charging Problems, and Display Errors?

A quick fix can turn a setup issue into permanent damage. Forcing parts, repeated restarts, or opening the shell may also affect warranty support.
Safe masturbation cup troubleshooting starts by stopping use, identifying the product architecture, checking user-removable parts, reviewing power and controls, and documenting the symptom. Do not open sealed electrical housings or bypass protective features.
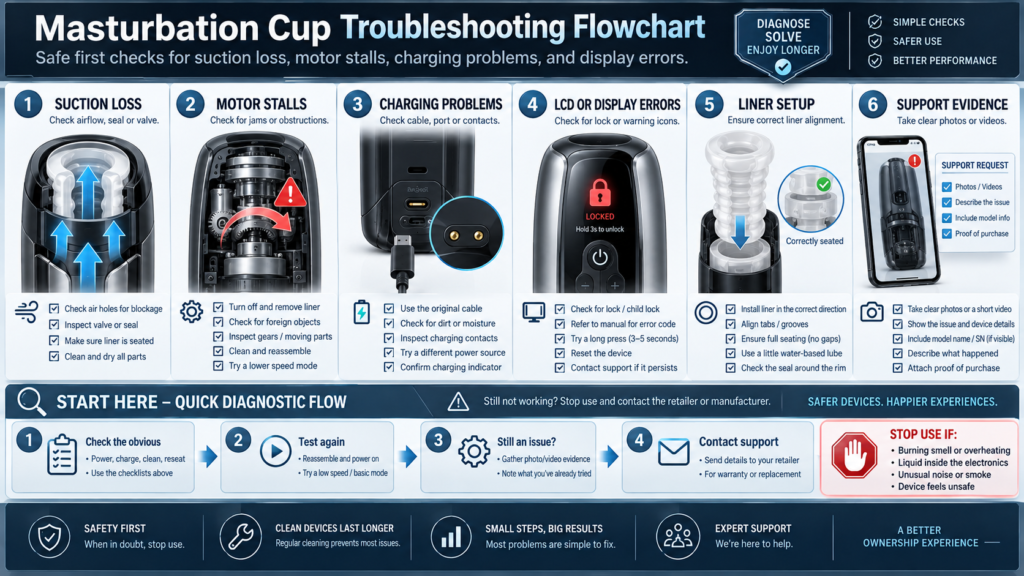
At WM Custom Dolls, we recommend identifying the symptom before attempting any correction. A suction problem may come from a valve, liner fit, or air path. A motor stall may appear after incorrect reassembly. A charging issue may involve the cable, contacts, port, moisture, or control state. The right checks depend on how the model is built.
This guide helps adult consumers and support teams make that first assessment safely. It does not replace product-specific instructions. If the required procedure is unavailable or unclear, stop testing and contact the retailer or supplier rather than improvising a repair.
Why Can Quick Fixes Make Masturbation Cup Troubleshooting Worse?
When a product stops responding, repeated button presses or forced movement can feel like the fastest solution. In practice, they may hide the original symptom or create a second problem.
Quick fixes become risky when they ignore whether the cause is mechanical, electrical, moisture-related, or linked to assembly. Start with observation and the least invasive check the product is designed to allow.
Before doing anything else, disconnect the product from charging if it is safe to do so. Stop operation and note what happened immediately before the problem appeared. Did it begin after cleaning, charging, liner removal, reassembly, transport, or a control change?
Then identify the architecture:
| Product Detail | Diagnostic Importance |
|---|---|
| Manual or powered | Determines whether electrical checks apply |
| Fixed or removable liner | Changes assembly and blockage checks |
| Valve, vent, or rear cap | May affect airflow and suction |
| Motorized movement | Introduces possible alignment or stall issues |
| LCD or indicator lights | May show locks, charging states, or errors |
| Charging port or contacts | Requires dry, undamaged connections |
| Sealed shell | Should not be opened without authorized instructions |
Do not begin an automatic masturbation cup repair by removing screws, prying open seams, bypassing a lock, or applying oil to internal parts. Lubricating an unknown mechanism can contaminate the liner, reach electronics, or affect materials. Opening a sealed housing can also remove useful evidence and may affect the warranty process.
A practical sequence is simple: stop, inspect, identify the architecture, review the product instructions, perform only external checks intended for the user, record the result, and contact support if the fault continues.
How Can Liner or Airflow Problems Mimic a Motor Defect?
A motor may sound weak or stop because another component is restricting movement. The cause is not always an internal electrical failure.
A misaligned liner, blocked air path, incorrectly fitted cap, or poorly seated removable part can increase resistance or reduce suction. Check only the components designed for normal user removal before treating the symptom as a motor defect.
For a suction-loss complaint, first establish what the product means by “suction.” Some models rely on a valve or sealed air path, while others may use an active pump. The marketing name alone does not confirm the mechanism.
Inspect accessible parts for obvious setup issues. A removable liner may need to sit in a particular orientation. Its edge may need to fit evenly around the shell opening. A rear cap or valve may also require a specific position. Follow the intended assembly method rather than pulling, stretching, or turning the liner in ways the product was not designed to support.
A similar issue can affect movement. If a motor works during a permitted test but stalls after the liner is installed, the liner may be twisted, misaligned, or not fully seated. Testing without the liner should only be attempted when the product instructions or support procedure specifically allow it, because some mechanisms are not designed to run outside the complete assembly.
Useful observations include:
- Whether suction changed immediately after liner removal or cleaning
- Whether the liner edge is evenly seated
- Whether a user-adjustable valve or cap is open, closed, or misaligned
- Whether the problem appears only after reassembly
- Whether unusual resistance, sound, or movement begins at startup
Do not insert tools into valves, force a moving part by hand, or keep powering a stalled motor. If correct reassembly does not resolve the symptom, stop testing and preserve the product’s current condition for support review.
What Should Be Checked Before Blaming the Battery?
A product that will not start may look like it has a failed battery. The actual issue could be the charging setup, wet contacts, a control lock, or an incomplete connection.
Before diagnosing a battery fault, verify the specified charging equipment, connection, indicator behavior, control sequence, and required charging conditions. Stop if the product becomes unusually hot, swollen, damaged, or produces an unusual odor.
Begin with the external charging path. Confirm that the cable and power source match the model’s requirements. Inspect the cable, connector, port, or magnetic contacts for visible damage, and do not use damaged charging equipment.
Charging contacts and ports must be clean and dry before connection. If the charging area was recently exposed to water during cleaning, do not reconnect power simply because the outer shell feels dry. Moisture may remain in seams or recessed connections, so allow the area to dry fully before attempting to charge.
Check what the product actually displays during charging:
- Does an indicator light, icon, or LCD state appear?
- Is the connector fully seated in its intended orientation?
- Does the product require a specific power-button action?
- Is a travel lock or shipping mode documented?
- Does the indicator change after the expected charging process?
Avoid estimating runtime or battery condition from an unverified screen graphic. A battery icon may show only broad states rather than an accurate percentage.
Do not repeatedly connect and disconnect the cable, bend the port, scrape contacts with metal, or substitute an undocumented power supply. If the product remains unresponsive after the normal checks, record the charging setup and indicator behavior for the retailer. Our male masturbator guide provides broader product information, but troubleshooting should still follow the exact product configuration.
How Do Locks, LCD Errors, and Control States Affect Diagnosis?
An unresponsive product is not always broken. It may be locked, paused, charging, in standby, or waiting for a long-press command.
Control states can mimic hardware faults when the user cannot tell whether the device is locked, paused, charging, or displaying an error. Match every icon and button sequence to the current product instructions rather than guessing from appearance alone.
Start by recording the screen or indicator exactly as it appears. Do not assume that a flashing symbol means low battery or a motor fault. Icon meanings vary between products, and some displays use animations that are not diagnostic codes.
Review the control mapping:
| Observation | What to Verify |
|---|---|
| Lock icon | Lock and unlock sequence |
| Flashing battery | Exact charging or low-power meaning |
| Mode number remains unchanged | Correct button and press duration |
| Screen works but motor does not | Pause, lock, assembly, or documented error state |
| Blank display | Power, charging connection, timeout, or possible fault |
| Repeating symbol | Manual-defined warning or status |
Short presses and long presses may trigger different actions. A buyer can accidentally activate a lock while trying to change a mode. Support teams should therefore avoid suggesting random button combinations and use only the control sequence confirmed for that SKU.
For a deeper review of display states, icons, charging indicators, and control mapping, see our LCD display masturbation cup checklist.
If the screen shows an undocumented message, photograph or record it. The supplier may need the startup sequence, icon, button action, and product version to determine whether the issue is a setup state, documentation gap, or product defect.
When Should Testing Stop Immediately?
Repeated testing can worsen a jam, overheat a motor, or complicate an after-sales claim. Knowing when to stop is part of responsible troubleshooting.
Stop testing if there is unusual heat, swelling, smoke, a strong odor, liquid near electrical parts, visible battery or cable damage, cracked housing, exposed wiring, grinding, or repeated motor stalling. Contact support without opening the shell.
A single symptom does not always identify the cause, but some conditions should end home troubleshooting immediately. Disconnect charging equipment if this can be done safely. Keep the product away from heat and flammable materials, and follow the battery or disposal guidance provided by the seller or local authorities where relevant.
Testing should also stop when:
- The housing has opened or cracked unexpectedly
- The charging port is loose, bent, or visibly damaged
- Liquid may have entered a display, motor, battery, or sealed seam
- The mechanism repeatedly jams after correct assembly
- A liner is tearing, deforming, or being pulled into a moving part
- An error returns after the documented reset procedure
- The next troubleshooting step is unclear
Do not force rotation, manually push a motorized carriage, bypass a sensor, bridge charging contacts, or continue running a stalled unit. These actions can damage gears, connections, liners, or the power system.
If the issue appeared after cleaning, do not use high heat to speed drying. Also avoid unapproved alcohol, bleach, oils, or solvents. The goal is to preserve safety and evidence, not to make the product run at any cost.
When support asks for a test, confirm whether it should be performed with the liner installed, removed, charged, or disconnected. Follow that sequence and stop if the product shows any warning condition.
What Evidence Helps a Retailer Evaluate an After-Sales Claim?
A message saying “my male masturbator is not working” identifies the outcome but not the cause. Structured evidence helps support teams respond without asking customers to perform risky tests.
Useful claim evidence includes the order reference, exact model, product version, symptom timing, control sequence, charging setup, liner installation, display state, and clear photos or a short video that respects the customer’s privacy.
We recommend documenting the problem before attempting repeated resets or reassembly. The product should be clean before return handling, and no personal-use content should appear in support media.
A practical evidence package can include:
- Order number and purchase channel
- Product name, SKU, batch code, or packaging label
- Date the problem was first noticed
- What happened immediately before the symptom
- Whether the liner had been removed or reinstalled
- Charging cable and connection shown clearly
- Screen, indicator, valve, cap, or control state
- A short video showing the normal startup attempt
- Photos of visible damage, without dismantling the shell
The video should be short and focused. Show the model label, control input, indicator response, and symptom. Do not include intimate or identifying background details. Retailers should provide a secure and discreet submission route.
Do not discard the box, accessories, cable, manual, or damaged component until support has reviewed the claim. These items may help identify a missing part, version mismatch, or charging issue. Likewise, do not open the product simply to create “better evidence.”
At WM Custom Dolls, we encourage distributors to define evidence requirements before launch so customer-service teams know what information is genuinely useful without asking buyers to dismantle or repeatedly test a faulty product.
How Should Support Teams Separate Setup Issues From Defects?
Replacing every product immediately increases cost, but blaming every symptom on setup damages customer trust. Support teams need a consistent decision process.
Support teams should classify symptoms by architecture, confirm the normal setup steps, request proportionate evidence, and escalate unresolved or safety-related cases. A customer should never be asked to dismantle a sealed powered product.
A symptom-based script is more useful than a general troubleshooting paragraph. Begin with the buyer’s reported issue and branch into only the relevant questions.
| Reported Symptom | First Support Checks | Escalation Point |
|---|---|---|
| Weak or lost suction | Liner, cap, valve, and seal position | Correct setup does not restore the function |
| Motor stalls | Liner alignment and permitted control test | Repeated stall, grinding, heat, or jam |
| Will not charge | Correct cable, dry port, contacts, and indicator | Damage, heat, no response, or unstable connection |
| LCD error | Exact icon, lock state, and product procedure | Undocumented or recurring error |
| Works before assembly | Liner orientation and seating | Failure continues after correct reassembly |
| Moisture suspected | Stop charging and allow safe drying | Moisture near sealed electronics |
Retailers should record which checks were completed and avoid asking customers to repeat them unnecessarily. The script should also state clear stop-use conditions and explain what happens next: further review, replacement-part assessment, warranty evaluation, or another documented resolution.
For private-label products, the support script, manual, quick-start card, packaging, and product page should use the same terminology. If the box calls a control “suction” while the manual calls it “pressure,” diagnosis becomes harder.
Repeated symptoms should also be tracked by SKU and production version. Patterns may reveal unclear instructions, packaging pressure on a control, liner-fit variation, charging-accessory confusion, or a defect requiring supplier review. Wholesale and private-label buyers can contact WM Custom Dolls to discuss documentation, packaging, mixed orders, and after-sales planning.
FAQ
What should I check if suction suddenly becomes weak?
Stop the product and check only the liner, valve, cap, and seal positions intended for normal user adjustment or removal. If the change appeared after cleaning or reassembly and correct installation does not resolve it, document the symptom and contact support.
Why can a motor work without the liner but stall after assembly?
The installed liner may be twisted, misaligned, too tightly seated, or interfering with a moving component. Do not continue unloaded testing unless the product is designed for it, and stop if stalling, heat, or unusual sounds continue.
What should I do if the cup will not charge?
Use the specified cable and power setup, inspect for visible damage, and make sure the charging area is completely dry. Record any light or LCD response, then contact support if the normal charging process produces no response.
Should a sealed automatic cup be opened at home?
No. Opening a sealed powered housing can expose electrical components, worsen damage, remove useful claim evidence, and affect warranty options. Use external checks only unless an authorized service provider gives model-specific instructions.
Conclusion
Stop, identify, inspect, and document before attempting a fix. Avoid forcing mechanisms or opening sealed electrical housings, and escalate any repeated, unclear, or safety-related fault. Contact WM Custom Dolls for model-specific support or wholesale after-sales planning.
Planning a Wholesale Order?
Share your product interests, estimated quantity and destination market with our team.
Request Wholesale Information