


Blog
How to Clean and Dry a Masturbation Cup: Why Does Product Design Change the Routine?

One cleaning routine can damage the wrong cup. Fixed liners, closed ends, valves, and powered shells all create different moisture and care risks.
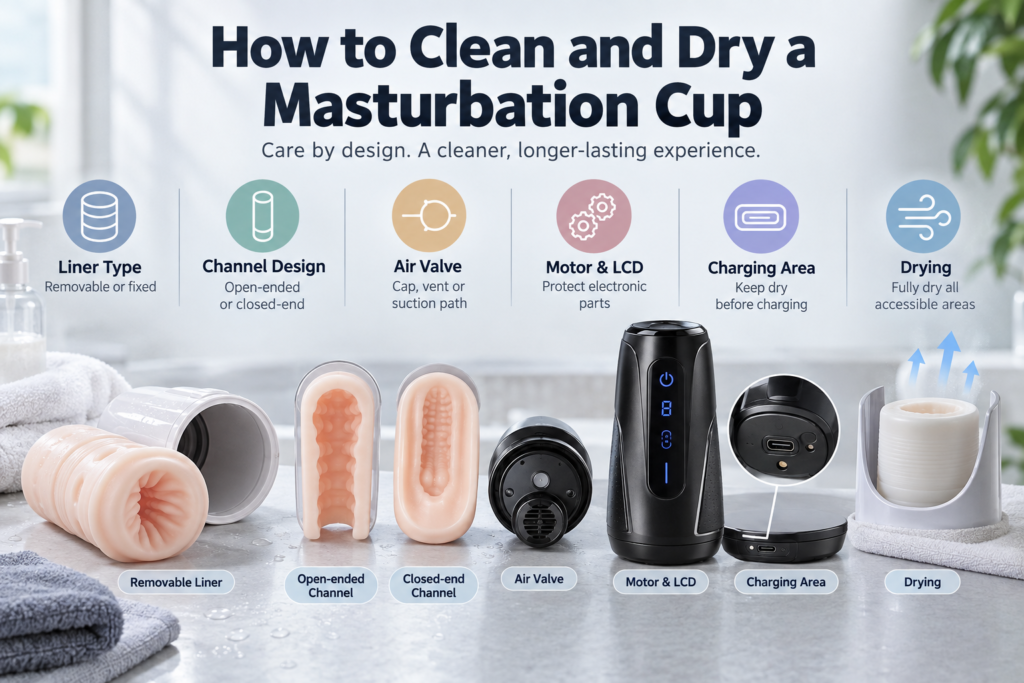
How to clean a masturbation cup depends on its architecture. Check whether the liner removes, whether the channel is open or closed, whether air valves are present, and whether the shell contains electronics before deciding how to clean and dry it.
At WM Custom Dolls, we recommend checking the care instructions for the exact model before cleaning it. Generic advice often focuses only on rinsing the inner sleeve, but that may overlook moisture behind a liner, a closed rear section, shell seams, valve paths, or electronic controls.
This article gives adult consumers, retailers, and customer-service teams a practical way to understand architecture-specific care. It does not replace the product manual. Where water exposure, removable parts, cleaning agents, or drying methods are unclear, the instructions supplied with the product should take priority.
Why Does Cup Architecture Matter as Much as Material?
Two products may use similar soft liners but still need different care because the surrounding structure determines which areas can be reached, rinsed, separated, and dried.
Cup architecture determines cleaning access. Removable liners, closed channels, air valves, seams, motors, displays, and charging areas can all change the safest cleaning and drying method.
A basic “rinse, wash, and dry” routine may be enough for a simple manual sleeve with full access, but it is not universal. A structured masturbation cup can combine an outer shell, internal liner, rear cap, air-control component, motor housing, display panel, or charging port. Each area reacts differently to water and can retain moisture in different ways.
Before cleaning, identify the product type:
| Architecture Detail | Why It Changes Care |
|---|---|
| Removable liner | May allow access to both liner surfaces and the shell interior |
| Fixed liner | Can limit access behind the liner and make drying slower |
| Open-ended channel | Often provides more airflow during drying |
| Closed-end channel | May retain moisture in the rear area |
| Air valve or cap | Can create small passages that need model-specific care |
| Motor or LCD shell | Usually requires greater protection from water exposure |
| Charging port or contacts | Must remain dry before charging |
The first step is not choosing a cleaner. It is understanding what can safely be separated and which parts must stay protected. Check the product diagram, package insert, or care instructions before removing anything. A visible seam does not necessarily mean a component is detachable, and a soft liner does not mean the entire cup can be submerged.
For retailers, architecture should also guide support content. A simple manual cup and an automatic model should not receive identical care instructions. Clear differences at the product-page and after-sales level can reduce avoidable questions, returns, and accidental damage.
How Should Removable and Fixed Liners Be Handled Differently?
Removing an unsupported liner can stretch or damage it. Leaving a liner inside the shell when it is designed to come out can make drying slower and hide moisture between surfaces.
A removable liner should only be taken out when the product is designed for removal. Fixed liners should remain in place, with cleaning and drying limited to the accessible areas intended for that model.
A removable liner usually makes it easier to clean the internal channel, the outer liner surface, and the area where the liner contacts the shell. It also makes it easier to see whether moisture remains between components after washing.
When the liner is confirmed removable, we suggest a conservative sequence:
- Turn off the product and disconnect it from charging.
- Remove only the parts designed to come apart.
- Clean the liner according to the recommended water and cleaner guidance.
- Clean the accessible shell interior using the appropriate method for that shell.
- Dry the liner inside and outside before reassembly.
- Reassemble only when all relevant surfaces are fully dry.
Do not pull a liner forcefully from a structured shell. Some liners are secured with a lip, cap, locking ring, or molded attachment. If there are no removal instructions and the liner does not release naturally as designed, treat it as fixed rather than forcing it apart.
A fixed liner creates a different challenge. Moisture or cleaning residue can remain around the liner-shell interface, rear base, or seams. Clean only through the intended access points, and avoid turning the liner inside out, detaching bonded areas, or inserting tools into spaces that were not designed to be reached.
For retailers, “removable liner” should be treated as a verified product feature rather than a visual assumption. It is useful information on a product page because it directly affects cleaning access, but it should match the current production version and supplied care instructions.
Why Are Closed-End Channels Harder to Dry?
A closed rear section may trap moisture where it is difficult to see. The front of the liner can appear dry while water remains deeper inside the channel.
Closed-end channels often need more careful draining and drying than open-ended designs because moisture can remain near the rear of the liner, shell base, cap, or internal seam.
An open-ended sleeve allows air to pass through both ends, which can make drainage and drying easier. A closed-end cup has only one main opening, so moisture is more likely to collect deeper in the channel. This becomes more important when the liner is fixed or when a rear cap or shell base further limits airflow.
The goal is not to make the product dry as quickly as possible. It is to avoid sealing moisture inside areas that are difficult to inspect. After cleaning, allow excess water to drain naturally from the accessible opening and keep the cup in a position that encourages airflow. Aggressive shaking is unnecessary and may not be suitable for products with caps, motors, displays, or internal assemblies.
A practical drying check includes:
- Is the opening visibly dry?
- Are the liner edges dry where they meet the shell?
- Is the rear section free of pooled water, if visible?
- Are caps, removable bases, or air components dry before reassembly?
- Are charging contacts and ports dry before power is connected?
Do not use high heat, boiling water, UV devices, alcohol, bleach, or other aggressive methods unless they are specifically approved for that product. Heat can affect soft materials, adhesives, shells, seals, and electronic components, while strong cleaning agents may leave residue or damage surfaces.
Storage matters too. Do not place a still-damp cup into a sealed pouch, box, or tightly closed container. Give the product enough airflow to finish drying naturally, and check the areas you can access before putting it away.
What Do Air Valves and Suction Paths Add to Cleaning?
A cap or valve may look like a small detail, but it can change airflow, drainage, and the places where residue or moisture collects.
Air valves, vents, rear caps, and suction paths add small areas that may retain moisture. Clean and dry them according to the product design without forcing water through openings whose function is unclear.
Some masturbation cups use rear caps, vents, air-release holes, or adjustable valves to change pressure and suction during use. These components also create extra surfaces and narrow passages that should not automatically be treated like the main liner channel.
A visible rear opening is not necessarily a wash-through channel. It may be part of an air-control system, a structural feature, or an opening positioned close to internal components. Before rinsing it, confirm whether the cap or valve is intended to open, detach, wipe clean, or come into contact with running water.
Where an air component is designed to be cleaned separately, follow its normal sequence. This may involve opening a cap, wiping an accessible surface, rinsing a removable component, or leaving the part open until it is dry. Avoid inserting sharp tools, cleaning brushes, or narrow objects into valve paths unless the product is specifically designed for them.
For content and support teams, air-control products usually need clearer care instructions than a basic manual cup. Product information should indicate whether the cap or valve is removable and whether it changes the cleaning route. If those details are not confirmed, broad claims such as “easy-clean valve” are better avoided.
A useful internal support checklist includes:
| Question | Verification Needed |
|---|---|
| Does the cup have a valve, cap, or vent? | Current retail-intent sample |
| Is the component removable? | Approved manual and assembly diagram |
| Can it be rinsed or only wiped? | Model-specific water wording |
| Does it affect drying time? | Manual guidance or supplier confirmation |
| Is there an electronic area nearby? | Product construction and QC record |
This helps prevent simple manual-cup cleaning advice from being applied to a more complex airflow design.
How Should Automatic Cups, Motors, and LCD Areas Be Protected?
Powered products require more than liner care. Water around controls, displays, ports, and motor housings can create avoidable failures even when the internal sleeve itself is washable.
Automatic cup care should separate the washable or wipeable liner area from the powered shell. Motors, LCD panels, buttons, charging ports, and contacts need to be protected according to the product’s actual water-resistance design.
A powered masturbator may include buttons, motors, rechargeable batteries, charging contacts, USB ports, display windows, or removable liners. These features create different care zones within the same product. The liner may be washable while the surrounding shell requires wiping rather than rinsing.
Before cleaning an automatic cup:
- Turn it off.
- Disconnect any charging cable or dock.
- Confirm whether the liner can be removed.
- Check the water guidance for both the liner and shell.
- Identify the charging area, display, buttons, and seams.
Do not assume that an electronic shell can be submerged simply because the product is described as waterproof or water-resistant. Different components may have different exposure limits, and the liner, shell, charging connection, or accessory may not all share the same level of protection.
For many powered designs, the practical approach is to clean the removable or accessible liner separately and wipe the outer shell rather than exposing the entire unit to running water. Charging ports, magnetic contacts, display edges, and button seams deserve particular attention.
After cleaning, inspect the charging area before reconnecting power. Ports and contacts should be free from visible moisture, and the product should not be placed on a charger while dampness may still remain around the connection area.
Retailers should keep manual and automatic product care instructions separate. A generic card that says “rinse thoroughly under water” can create unnecessary support problems when buyers apply it to a motorized shell.
What Does Fully Dry Actually Mean?
Drying is not only about the outside surface. Moisture can remain inside liners, around seams, beneath caps, inside valve paths, and near charging areas after the product appears dry from the outside.
Fully dry means accessible inner and outer surfaces, liner-shell interfaces, caps, valves, and charging areas are free from visible moisture before reassembly, charging, or sealed storage.
A cup can feel dry in your hand while still holding moisture deeper inside. This is why wiping the outside is not enough for structured products. The exact drying route depends on the design, but the basic principle is the same: check every accessible area where water could collect.
For a removable-liner product, dry both sides of the liner. Do not reinstall it while the outside of the liner or the shell interior is still damp, because moisture trapped between those surfaces becomes difficult to notice after reassembly.
For a fixed-liner product, pay attention to the opening edge, channel, rear accessible area, cap seam, and liner-shell boundary. Closed-ended designs may need more time and airflow than they appear to need from the front opening alone.
For an automatic cup, add charging ports, contacts, controls, and display edges to the inspection list. Reconnect power only after the relevant connection areas are dry.
Avoid unsupported shortcuts. Hair dryers, radiators, ovens, microwaves, high-heat cabinets, or prolonged intense sunlight can affect soft materials, adhesives, seals, and electronics. Sealing a damp product inside a storage bag also reduces the airflow needed to finish drying.
A clean towel or lint-free cloth can help remove visible moisture from suitable surfaces, but air-drying is still important. Store the product only after the accessible parts are dry and removable components have been reassembled correctly.
What Should Retailers Put on a Model-Specific Care Card?
Generic care cards may save time during packaging design, but they can create unnecessary support issues when different products have different liners, shells, valves, or electronic components.
A model-specific care card should identify removable parts, water limits, cleaning zones, drying checks, charging precautions, storage guidance, and the official support route for that SKU.
Retailers and private-label brands should treat cleaning information as part of the product release package. The box, manual, product page, care card, QR destination, and customer-service script should all reflect the same current product configuration.
A practical care card can include the following fields:
| Care Card Section | What to Include |
|---|---|
| Product ID | SKU, model name, revision date, or version number |
| Product architecture | Manual or powered; removable or fixed liner |
| Approved removable parts | Only parts shown in the manual |
| Cleaning zone | Liner, shell, cap, valve, and electronics instructions |
| Water wording | Exact language from the official manual |
| Drying check | Liner, shell interface, valve/cap, and charging area |
| Charging reminder | Charge only when approved contacts or ports are dry |
| Storage note | Store clean, dry, and separated as instructed |
| Help route | Current support URL or QR-linked support page |
We recommend using a QR code that leads to a maintained support page rather than relying on an unchangeable PDF alone. The landing page can host the latest manual, product-version notes, replacement guidance where available, and current contact details. A printed short URL can provide a useful backup.
For broader product education, customers can also visit our male masturbator guide. SKU-level care instructions should still take priority whenever cleaning requirements vary by shell construction, liner design, electronics, or water protection.
Private-label buyers should review the product sample, manual, cleaning card, packaging artwork, and support URL together before production. If the liner attachment, cap design, charging port, or shell construction later changes, the care information should be updated for the next production run.
FAQ
Can every masturbation cup be rinsed under water?
No. Some models have fixed liners, closed shells, motors, display panels, or charging areas that require different care. Check the instructions for the exact product before rinsing the cup or shell.
Should a removable liner be dried outside the shell?
If the liner is designed to be removed, drying it outside the shell makes it easier to inspect both the liner and the shell interface. Reassemble only after the relevant parts are clean and dry.
How do air valves affect cleaning?
Valves, caps, and vents can create small areas where moisture remains. Check whether each part is designed to open, wipe clean, rinse, or detach before cleaning it.
Can an LCD or motorized shell be submerged?
Do not submerge an LCD or motorized shell unless the product instructions specifically allow it. Charging ports, controls, display edges, and seams should be treated carefully and kept dry before charging.
Conclusion
Clean by product architecture, not habit. Identify the liner, channel, valve, shell, and powered areas first, then clean and dry each part according to how the product is built. Make sure accessible areas are dry before reassembly, charging, or storage. Contact WM Custom Dolls for sourcing or private-label support.
Planning a Wholesale Order?
Share your product interests, estimated quantity and destination market with our team.
Request Wholesale Information